渗透技巧——Windows下的Masscan和Nmap 及结果导出excel
0x00 前言
在内网渗透中,信息搜集尤为重要。
面对内网的复杂环境,虽说网络扫描容易暴露自己,但通过扫描可以发现内网的存活主机、开放端口,运行服务、操作系统等信息,为进一步渗透奠定基础。
扫描工具的选取,不仅要考虑功能,更要考虑工具的适用性。
现实中的跳板通常并不是一台Linux服务器,没有合适的环境安装Nmap、Zmap和Masscan。
换句话说,可在Windows下直接使用的命令行扫描工具有哪些呢? 知名的开源扫描工具Nmap、Zmap和Masscan,三款工具在功能上各有特色。 在适用性上,Zmap在Windows下使用需要安装Cygwin,因此不在考虑范围内。 Masscan支持Windows平台的编译,Nmap提供命令行版本,看起来Masscan和Nmap符合要求。 但是,Masscan和Nmap的使用均需要WinPcap的支持,也就是说,使用前均需要安装WinPcap。
那么,能否通过命令行安装WinPcap呢?
0x01 简介
本文将要要解决以上问题,介绍内容如下:
1. Windows平台编译Masscan
2. Windows命令行安装WinPcap
3. Masscan使用介绍
4. Nmap配置和使用介绍
0x02 Windows平台编译Masscan
Masscan下载地址:
https://github.com/robertdavidgraham/masscan/
编译工具:vs2012
编译选项中未添加vs2012的编译配置,所以直接编译会报错
解决方法:
在string_s.h中添加vs2012配置信息
位于misc-string_s.h,添加代码如下:
#if defined(_MSC_VER) && (_MSC_VER == 1700)
/*Visual Studio 2012*/
# include
# include
# define strcasecmp     _stricmp
# define memcasecmp     _memicmp
# ifndef PRIu64
#  define PRIu64 "llu"
#  define PRId64 "lld"
#  define PRIx64 "llx"
# endif
编译成功,执行masscan.exe,提示Packet.dll: not found
如下图
Packet.dll获取方法:
安装WinPcap后在System32下获得
WinPcap下载地址:
https://www.winpcap.org/install/default.htm
在另一系统安装WinPcap,在System32下找到Packet.dll和Wpcap.dll,复制到测试系统下masscan.exe的同级目录,再次运行
程序正常启动,但是无法扫描,报错如下:
FAIL: Error opening adapter: 系统找不到指定的设备。 (20)
adapter[DeviceNPF_{71D19B82-0818-4685-A8E7-A6C7C812F2EA}].init: failed
疑问:测试系统也需要安装WinPcap才能使用?
经实际测试,确实如此
0x03 Windows命令行安装WinPcap
测试32位系统:
使用ProcessMonitor监控WinPcap安装过程(32位系统),获得如下信息:
1. 在system32文件夹下释放packet.dll和wpcap.dll
2. 在system32drivers释放npf.sys
3. 安装服务npf
通过sc命令获得安装服务npf的配置信息:
sc qc npf
获取信息如下:
[SC] QueryServiceConfig 成功
SERVICE_NAME: npf
        TYPE               : 1  KERNEL_DRIVER
        START_TYPE         : 3   DEMAND_START
        ERROR_CONTROL      : 1   NORMAL
        BINARY_PATH_NAME   : system32driversnpf.sys
        LOAD_ORDER_GROUP   :
        TAG                : 0
        DISPLAY_NAME       : NetGroup Packet Filter Driver
        DEPENDENCIES       :
        SERVICE_START_NAME :
如下图

查看运行状态:
sc query npf
获取信息如下:
SERVICE_NAME: npf
        TYPE               : 1  KERNEL_DRIVER
        STATE              : 4  RUNNING
                                (STOPPABLE, NOT_PAUSABLE, IGNORES_SHUTDOWN)
        WIN32_EXIT_CODE    : 0  (0x0)
        SERVICE_EXIT_CODE  : 0  (0x0)
        CHECKPOINT         : 0x0
        WAIT_HINT          : 0x0
如下图

对应的注册表会创建键值,表示服务配置信息,位置如下:
HKEY_LOCAL_MACHINESYSTEMControlSet001Servicesnpf
HKEY_LOCAL_MACHINESYSTEMCurrentControlSetServicesnpf
如下图
如下图
猜测,只要能够模拟上述安装操作,就能够实现WinPcap在命令行下的安装
模拟安装操作如下:
1、释放文件
copy packet.dll %SystemRoot%system32
copy wpcap.dll %SystemRoot%system32
copy npf.sys %SystemRoot%system32drivers
2、创建服务
sc create npf binPath= system32driversnpf.sys type= kernel start= demand error= normal tag= no DisplayName= "NetGroup Packet Filter Driver"
3、启动服务
sc start npf
测试命令如下:
masscan.exe -p80 192.168.81.143
成功执行masscan.exe,如下图

测试64位系统:
使用ProcessMonitor监控WinPcap安装过程(32位系统),获得如下信息:
1.在system32文件夹下释放64位packet.dll和wpcap.dll
2.在system32drivers释放64位npf.sys
3.在syswow64文件夹下释放32位packet.dll、wpcap.dll和pthreadVC.dll
4.安装服务npf
经实际测试和优化,在64位环境下执行32位的masscan.exe,不需要64位的packet.dll和wpcap.dll,不需要32位的pthreadVC.dll,仅需要安装64位驱动npf.sys
并且,无论是32位还是64位系统,packet.dll和wpcap.dll放在masscan.exe同级目录即可(当然,由于是vs2012编译,还需要msvcr110d.dll)
也就是说,针对32位和64位系统,只需要向system32drivers文件夹复制不同版本的npf.sys即可
接着创建服务npf并安装,整个流程结束
将以上过程通过批处理自动实现,一键安装脚本代码如下:
@echo off
cd %~dp0
if "%PROCESSOR_ARCHITECTURE%"=="x86" move npf_x86.sys %SystemRoot%system32driversnpf.sys
if "%PROCESSOR_ARCHITECTURE%"=="AMD64" move npf_x64.sys %SystemRoot%system32driversnpf.sys
if exist %SystemRoot%system32driversnpf.sys (echo move success!) else (echo move error!)
sc create npf binPath= system32driversnpf.sys type= kernel start= demand error= normal tag= no DisplayName= "NetGroup Packet Filter Driver"
sc start npf
相关代码和所需dll文件已上传至github,地址如下:
https://github.com/3gstudent/Winpcap_Install
0x04 Masscan使用介绍
扫描指定网段和端口:
masscan.exe -p80 192.168.81.1/24
找到一台开启80端口的服务器,回显如下:
Discovered open port 80/tcp on 192.168.81.143
扫描指定主机所有开放的端口:
masscan.exe -p0-65535 192.168.81.143
如下图
扫描指定主机的特定端口:
masscan.exe -p80,443 192.168.81.143
获取banner:
masscan.exe -p80,443,3306 192.168.81.143 --banners
通过配置文件启动扫描:
将配置信息保存在1.conf:
masscan.exe -p80,443,3306 192.168.81.143 --banners --echo>1.conf
读取配置信息1.conf,启动扫描:
masscan.exe -c 1.conf
修改扫描速度为100,000包/秒(Windos下最大为 300,000包/秒),默认100包/秒:
--rate 100000
输出格式:
-oX  (XML)
-oB  (Binary)
-oG  (Grep)
-oJ  (Json)
-oL  (List)
-oU  (Unicornscan format)
补充,默认情况,masscan开启如下配置:
-sS: this does SYN scan only (currently, will change in the future)
-Pn: doesn't ping hosts first, which is fundamental to the async operation
-n: no DNS resolution happens
--randomize-hosts: scan completely randomized
--send-eth: sends using raw libpcap
0x05 Nmap配置和使用介绍
NmapZip版下载地址:
https://nmap.org/dist/nmap-7.50-win32.zip
使用Nmap也要在命令行提前安装WinPcap
还要添加vs2013的dll:msvcp120.dll和msvcr120.dll(Nmap.exe通过vs2013编译)
去掉不相关文件,精简nmap,最终需要的支持文件列表如下:
libeay32.dll
msvcp120.dll
msvcr120.dll
nmap-mac-prefixes
nmap-os-db
nmap-payloads
nmap-services
nmap.exe
ssleay32.dll
###扫描指定网段和端口:
nmap.exe -p80 192.168.81.1-255
###或者
nmap.exe -p80 192.168.81.1/24

###扫描IP地址列表:
nmap.exe iL IP.txt

###扫描指定主机所有开放的端口:
nmap.exe 192.168.81.143

###扫描指定主机的特定端口:
nmap.exe -p80,443 192.168.81.143

###操作系统探测(-O):
nmap.exe -O 192.168.81.143

###端口上运行的服务版本探测(-sV):
nmap.exe -sV 192.168.81.143
端口扫描如下图

版本检测如下图
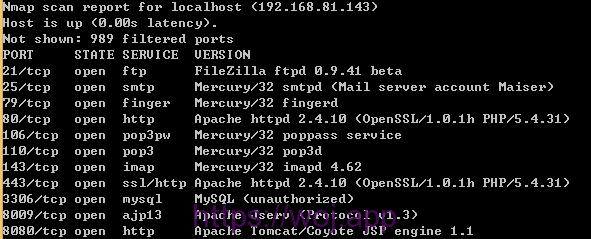
通过对比可知版本检测能够识别端口上的服务版本
注:
恢复版本检测(-sV)需要添加以下文件:
nse_main.lua
nmap-service-probes
nselib文件夹及文件夹内的文件
scripts文件夹及文件夹内的文件
路由信息探测(–traceroute)
nmap.exe --traceroute 192.168.81.143
综合探测(-A)
包括操作系统、服务版本和路由信息,也就是以上三者的集合
nmap.exe -A 192.168.81.143
扫描方式支持如下参数:
-sS/sT/sA/sW/sM: TCP SYN/Connect()/ACK/Window/Maimon scans
-sU: UDP Scan
-sN/sF/sX: TCP Null, FIN, and Xmas scans
--scanflags : Customize TCP scan flags
-sI : Idle scan
-sY/sZ: SCTP INIT/COOKIE-ECHO scans
-sO: IP protocol scan
-b : FTP bounce scan
常用扫描方式介绍:
TCP SYN Scan(-sS)
·半开放扫描(half-open scanning),没有建立三次握手连接,速度很快
·nmap默认扫描方式
TCP connect scan(-sT)
·完成三次握手过程(SYN,SYN/ACK,ACK),当然,速度会降低
·容易被检测
Udp scan(-sU)
·扫描UDP端口
TCP Null/FIN/Xmas scan(-sN/-sF/-sX)
·用来判断端口是否开放
·能够绕过一些无状态防火墙
Null scan (-sN)
·不设置任何标志位(tcp标志头是0)
FIN scan (-sF)
·只设置TCP FIN标志位
Xmas scan (-sX)
·设置FIN,PSH,和URG标志位
TCP ACK scan(-sA)
·不用于确定端口是否开放
·用于发现防火墙规则,确定防火墙规则是有状态的还是无状态的,哪些端口是被过滤的
·只设置ACK标志位
Custom TCP scan(–scanflags)
·手动指定任意TCP标志位来设计自定义扫描
·可用于绕过入侵检测系统
·需要对通信协议有深入的理解
Idle scan(-sI)
·伪造扫描源地址
注:
该源地址主机必须在线
也可伪造源端口,默认为80端口
伪造源端口格式如下:
1 | <zombie host[:probeport]> |
实例:
nmap.exe -sI 192.168.81.1:1234 192.168.81.143
PING Scan(-sP)
·使用ping来扫描主机是否在线
No PING Scan(-PN)
·不用ping进行扫描
注:
PN两个字母大写
输出格式:
1 2 3 4 5 6 7 | -oN <filespec> (标准) -oX <filespec> (XML) -oS <filespec> (ScRipT KIdd|3 oUTpuT) nmap默认输出均为大写格式,使用-oS会随机改写字母大小写 -oG <filespec> (Grep) -oA <basename> (输出至所有格式) 设置文件名称,一次性输出标准(.nmap)、XML(.xml)和Grep(.gnmap)三种格式的文件 |
注:
https://nmap.org/book/可获得更多Nmap使用介绍
0x06 小结
本文介绍了Windows平台下命令行使用Masscan和Nmap的方法,同时站在防御的角度提醒大家,内网安全同样重要,要谨慎对待。
-------------------------------------------------------
masscan报告转换脚本
1 2 3 4 5 6 7 8 9 10 11 12 13 14 15 16 17 18 19 20 21 22 23 24 25 26 27 28 29 30 31 32 33 34 35 36 37 38 39 40 41 42 43 44 45 46 47 48 49 50 51 52 53 54 55 56 57 58 59 60 61 62 63 64 65 66 67 68 69 70 71 72 73 74 75 | #coding=utf-8
import os
import sys
import time
import argparse
import xml.dom.minidom
import xlsxwriter
from xlsxwriter import Workbook
'''
author: c0ny1
date: 2018-09-28 18:23
'''
def convert_masscan_report(xml_path,xls_path):
workbook = xlsxwriter.Workbook(xls_path)
worksheet = workbook.add_worksheet('Scan info')
worksheet.autofilter("A1:H1") #设置过滤
worksheet.freeze_panes(1, 0) #冻结窗格
worksheet.lastrow = 0
summary_header = ["addr", "port", "state", "protocol", "addrtype", "reason", "reason_ttl", "scan_endtime"]
for idx, item in enumerate(summary_header):
worksheet.write(0, idx, item,workbook.add_format({"bold": True}))
worksheet.lastrow += 1
DOMTree = xml.dom.minidom.parse(xml_path)
data = DOMTree.documentElement
nodelist = data.getElementsByTagName('host')
host_info = {}
for node in nodelist:
scan_endtime = node.getAttribute('endtime')
scan_endtime = time.strftime('%Y-%m-%d %H:%M:%S',time.localtime(int(scan_endtime)))
address_node = node.getElementsByTagName('address')
addrtype = address_node[0].getAttribute('addrtype')
addr = address_node[0].getAttribute('addr')
port_node = node.getElementsByTagName('port')
for port in port_node:
protocol = port.getAttribute('protocol')
portid = port.getAttribute('portid')
state_element = port.getElementsByTagName('state')
state = state_element[0].getAttribute('state')
reason = state_element[0].getAttribute('reason')
reason_ttl = state_element[0].getAttribute('reason_ttl')
print '[+] | %s | %s | %s | %s | %s | %s | %s | %s |' % (addr,portid,state,protocol,addrtype,reason,reason_ttl,scan_endtime)
scan_info = [addr,portid,state,protocol,addrtype,reason,reason_ttl,scan_endtime]
for i in range(0,len(scan_info)):
worksheet.write(worksheet.lastrow, i, scan_info[i])
worksheet.lastrow += 1
workbook.close()
if __name__ == '__main__':
parser = argparse.ArgumentParser()
parser.add_argument("-i", "--input", metavar="XML", help="path to xml input")
parser.add_argument("-o", "--output", metavar="XLS", help="path to xlsx output")
if len(sys.argv) == 1:
sys.argv.append('-h')
args = parser.parse_args()
if args.input:
xml_path = args.input
else :
exit('[*] please use -i set xml path!')
if os.path.lexists(xml_path) == False:
exit('[*] %s does not exist!',xml_path)
if args.output:
xls_path = args.output
else:
xls_path = './masscan_report.xls'
convert_masscan_report(xml_path,xls_path) |
二、使用步骤
1.使用masscan进行扫描,扫描结果以xml保存
masscan.exe -p21,22,23,80,7001,5900 10.0.0.0/8 --rate=100000 -oX scan_result.xml
2.使用上面写的脚本转换出xls格式的报告
masscan-report-converter.py -i scan_result.xml -o scan_result.xls
最终效果如下:

文章来源:https://3gstudent.github.io/3gstudent.github.io/%E6%B8%97%E9%80%8F%E6%8A%80%E5%B7%A7-Windows%E5%B9%B3%E5%8F%B0%E8%BF%90%E8%A1%8CMasscan%E5%92%8CNmap/
http://gv7.me/articles/2018/masscan-report-converter/
布施恩德可便相知重
微信扫一扫打赏
支付宝扫一扫打赏